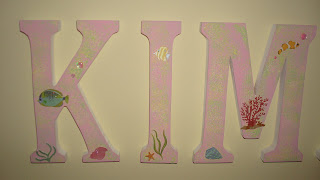
Here's the finished project(s):
Wooden Letters
Acrylic Paint (I used 4 colors for Kimber's: white, yellow, lime green and pink. I used 4 colors for Kaylan's: white, light green, sage green, light mocha brown)
Sponge
3-4 sheets of scrapbooking stickers (whatever matches your kids room!)
Ribbon (if you decide to hang your letters by tying a bow)
Staple Gun (if you want to hang the letters by tying a bow)
How to:
First make sure your letters are painted white (if they came white, you probably need another coat or two..they just don't make it thick enough!). When that completely dries, sponge one color at a time allowing them to dry throroughly between coats. The last color should be the one you want to show up the most.
If you're going to add ribbon, I'd do that now! Cut and staple your ribbons..then tie them.
Next, cut around the edges of all your scrapbooking stickers (don't peel them off just yet). Lay all your letters out in order, and figure out the placement of your stickers. Once you're happy with your designs, peel and stick!
All done! :)
Here's some close ups since I don't have any pics of the process...
Happy crafting!


No comments:
Post a Comment